Navigate
Shop
Brand
Elevate your inbox
SUBSCRIBE NOW


How to Create a Family Self-Portrait Using Your iPhone


")

Previously I wrote about my heart and passion behind capturing our family portraits during the current pandemic we are facing. You can read all about that here. As the next step in this project, I wanted to walk you through how to create a family self-portrait using your iPhone. Please keep in mind that while I am sharing exact technical details as an iPhone user, most of what is in this post can be applied no matter the smartphone you have.
The goal is to not make it more complicated than it needs to be. However, we want the result to be an iconic and proper portrait to document current history. And for you to have a photograph that helps tell your story.
Technical Settings on Your iPhone
FRONT FACING CAMERA VS. REAR CAMERA
Let’s start at step one and understand the proper settings on our iPhone for the best setup to create a self-portrait. Because we want to make sure everyone is included in the portrait, you may be inclined to set your iPhone up in selfie mode so you can see yourself and everyone else when taking your photo.
However, please know that in selfie mode with the camera flipped around front-facing, your final image file will be lower in quality. Also, you will not be able to use the front-facing camera if you are utilizing the built-in self-timer.
While sometimes I absolutely use the camera front-facing in order to see everyone and what our photo looks like, for this particular project I would highly suggest taking your portrait with the rear camera.
Yes, this does mean not being able to see your photo as you take your photo, but we are going to work to reduce any issues before everyone is in the frame and ready to go.
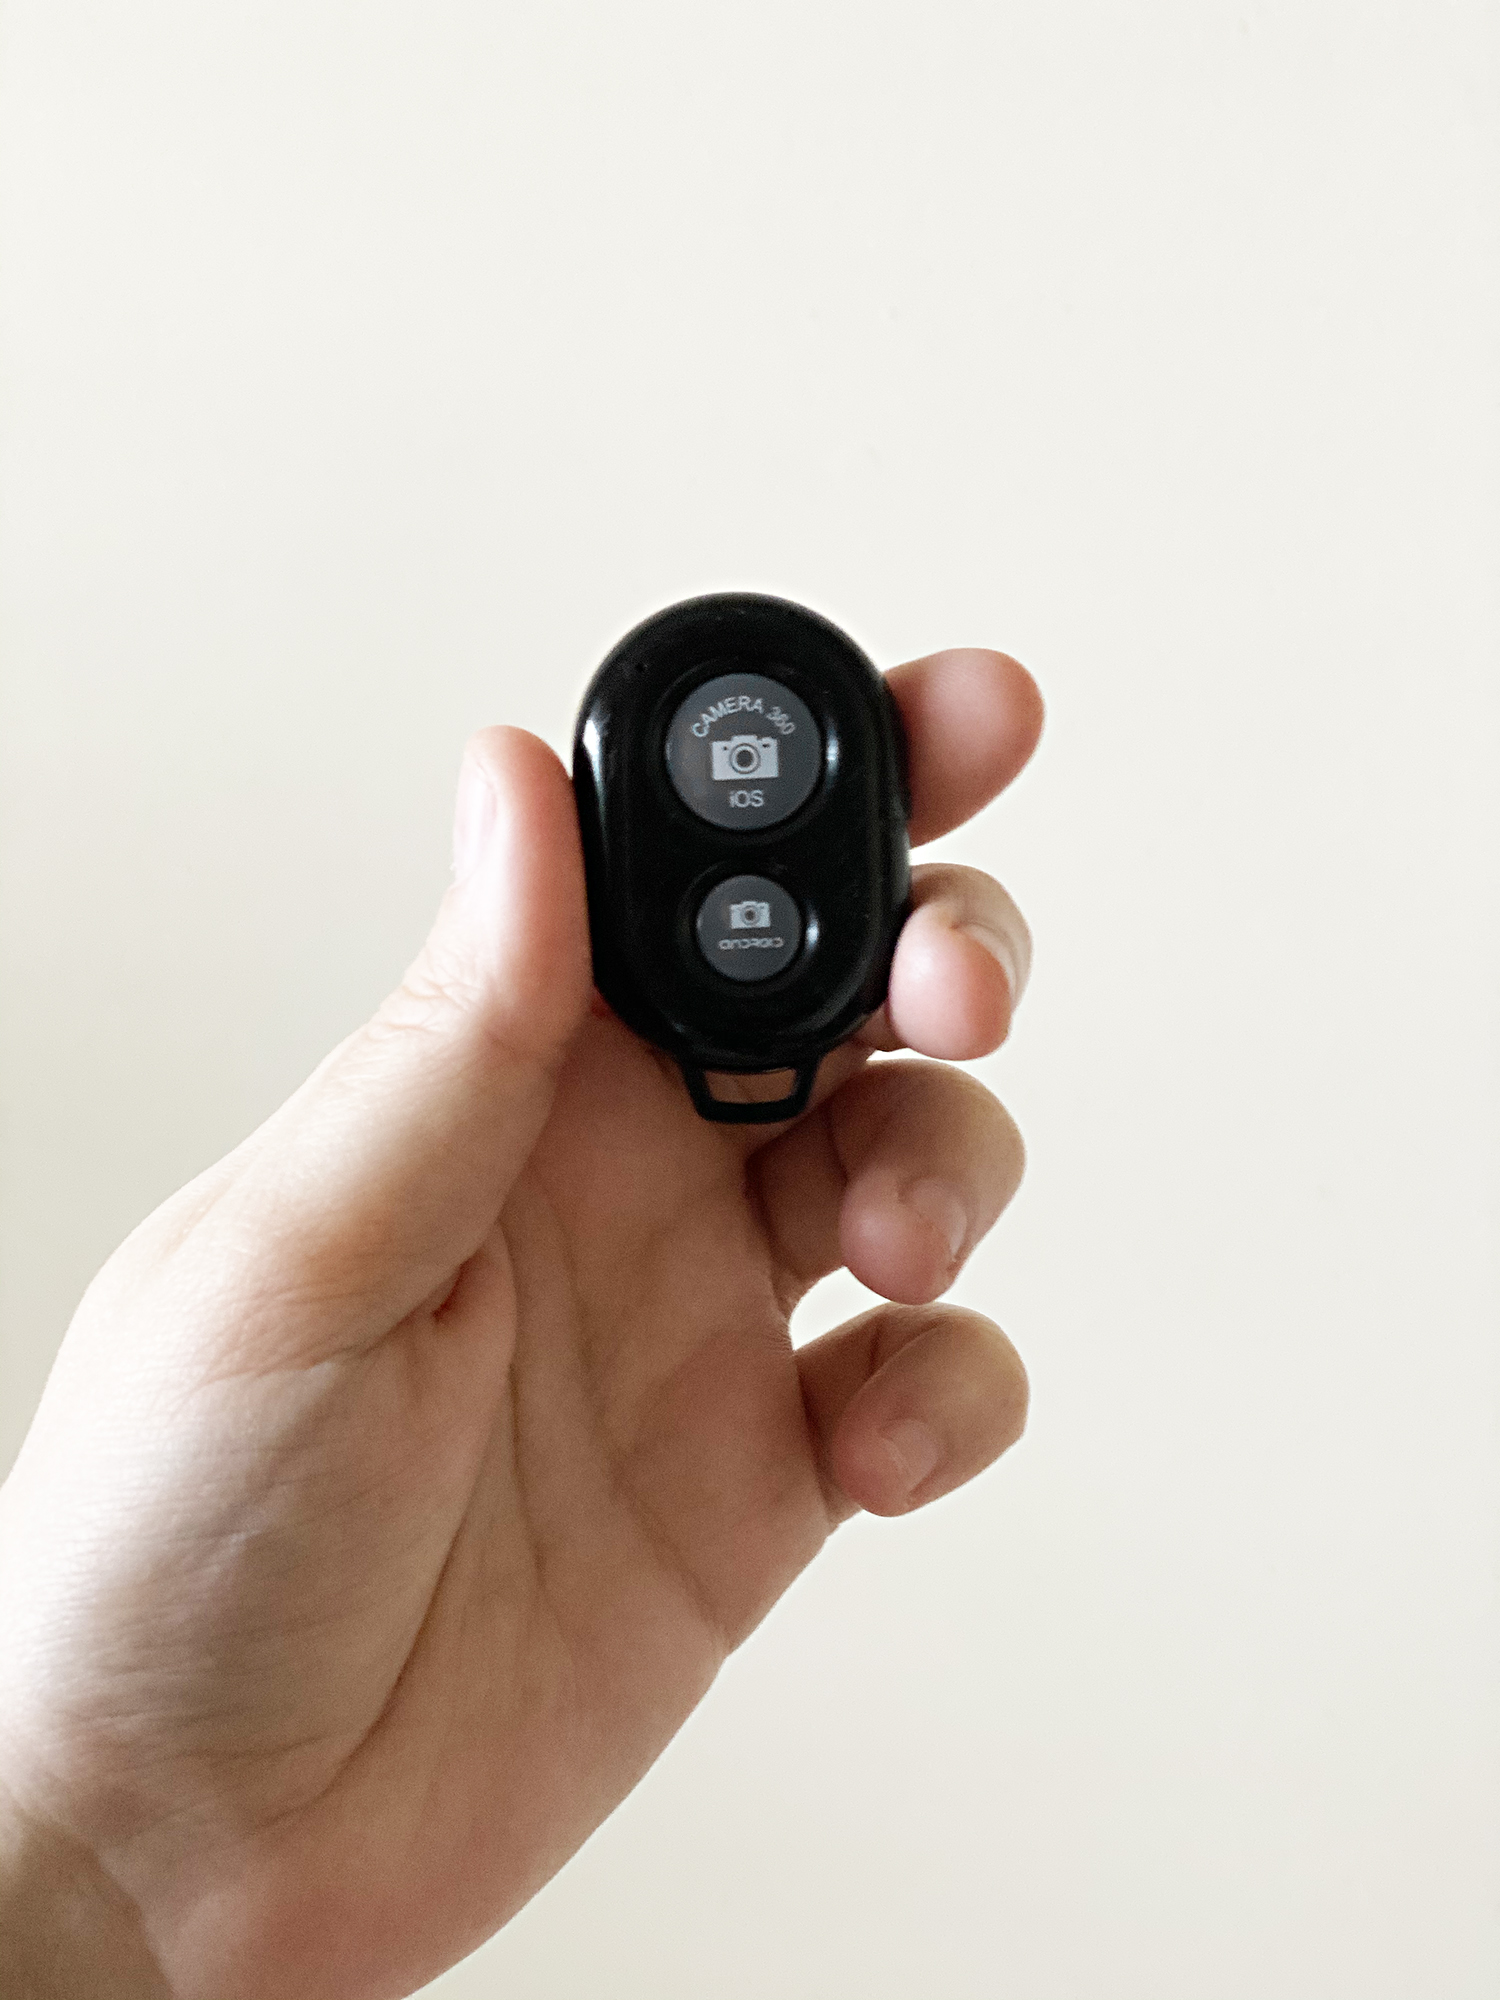
You have two options when it comes to self-portraits. You can use a BlueTooth remote if you have one, but if you don’t your iPhone has a built-in timer that will work just fine.
IF YOU ARE USING THE BUILT-IN SELF TIMER
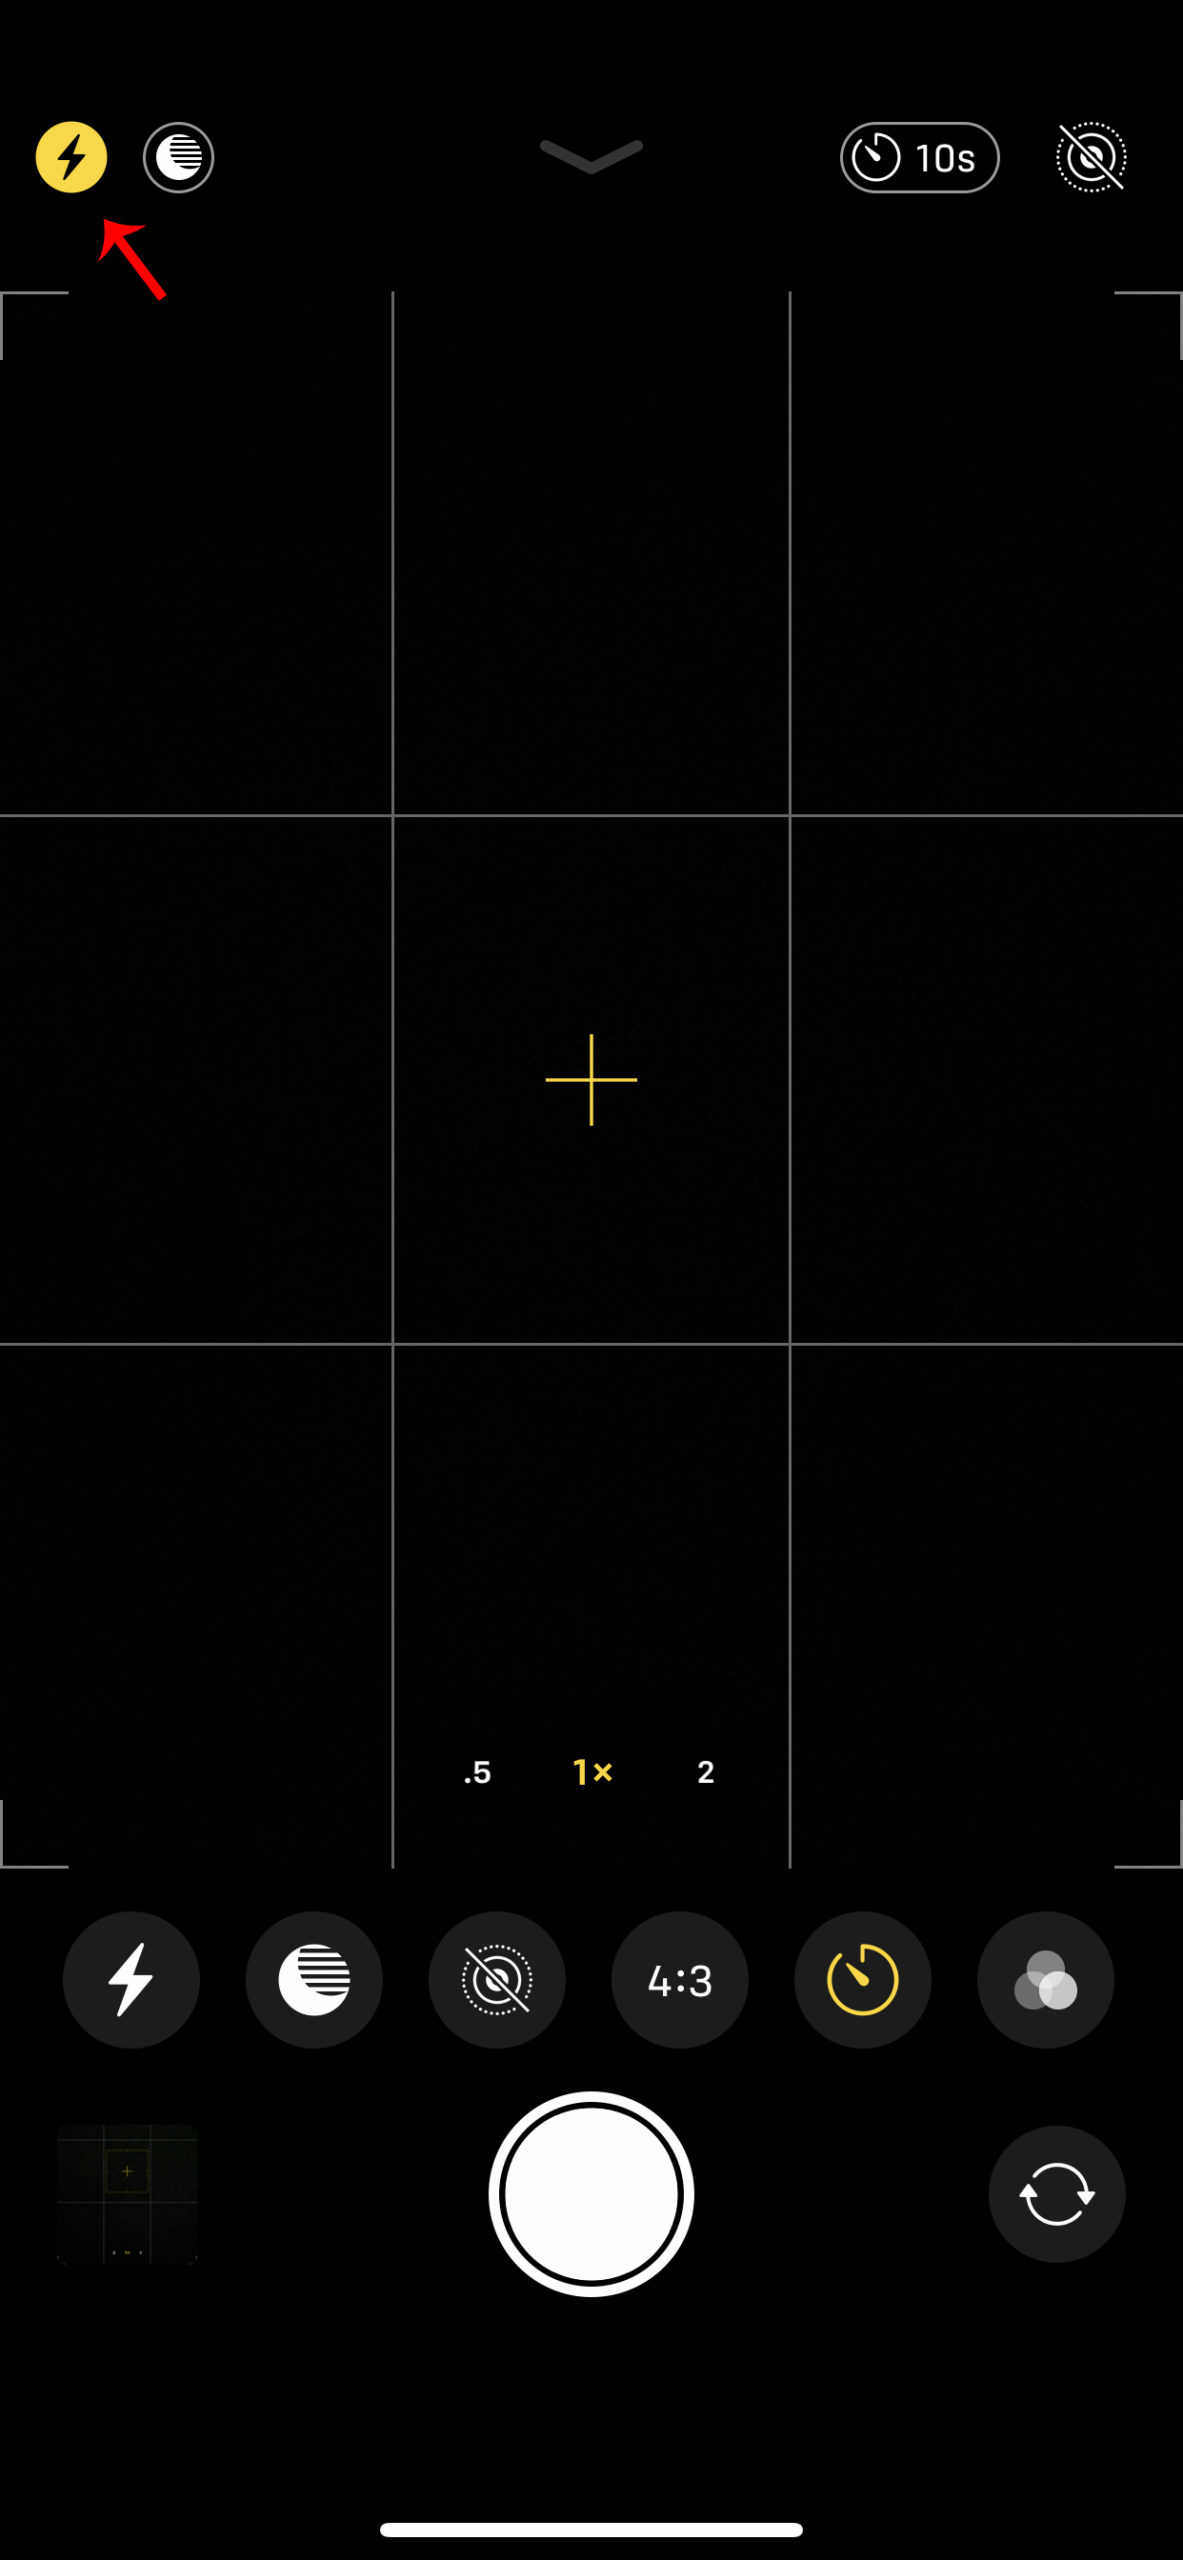
Now, my iPhone settings might look different than yours based on the model you have, but the following screenshots will show you where to access the built-in self-timer.
Once you have opened your camera app, you will see an arrow at the top.
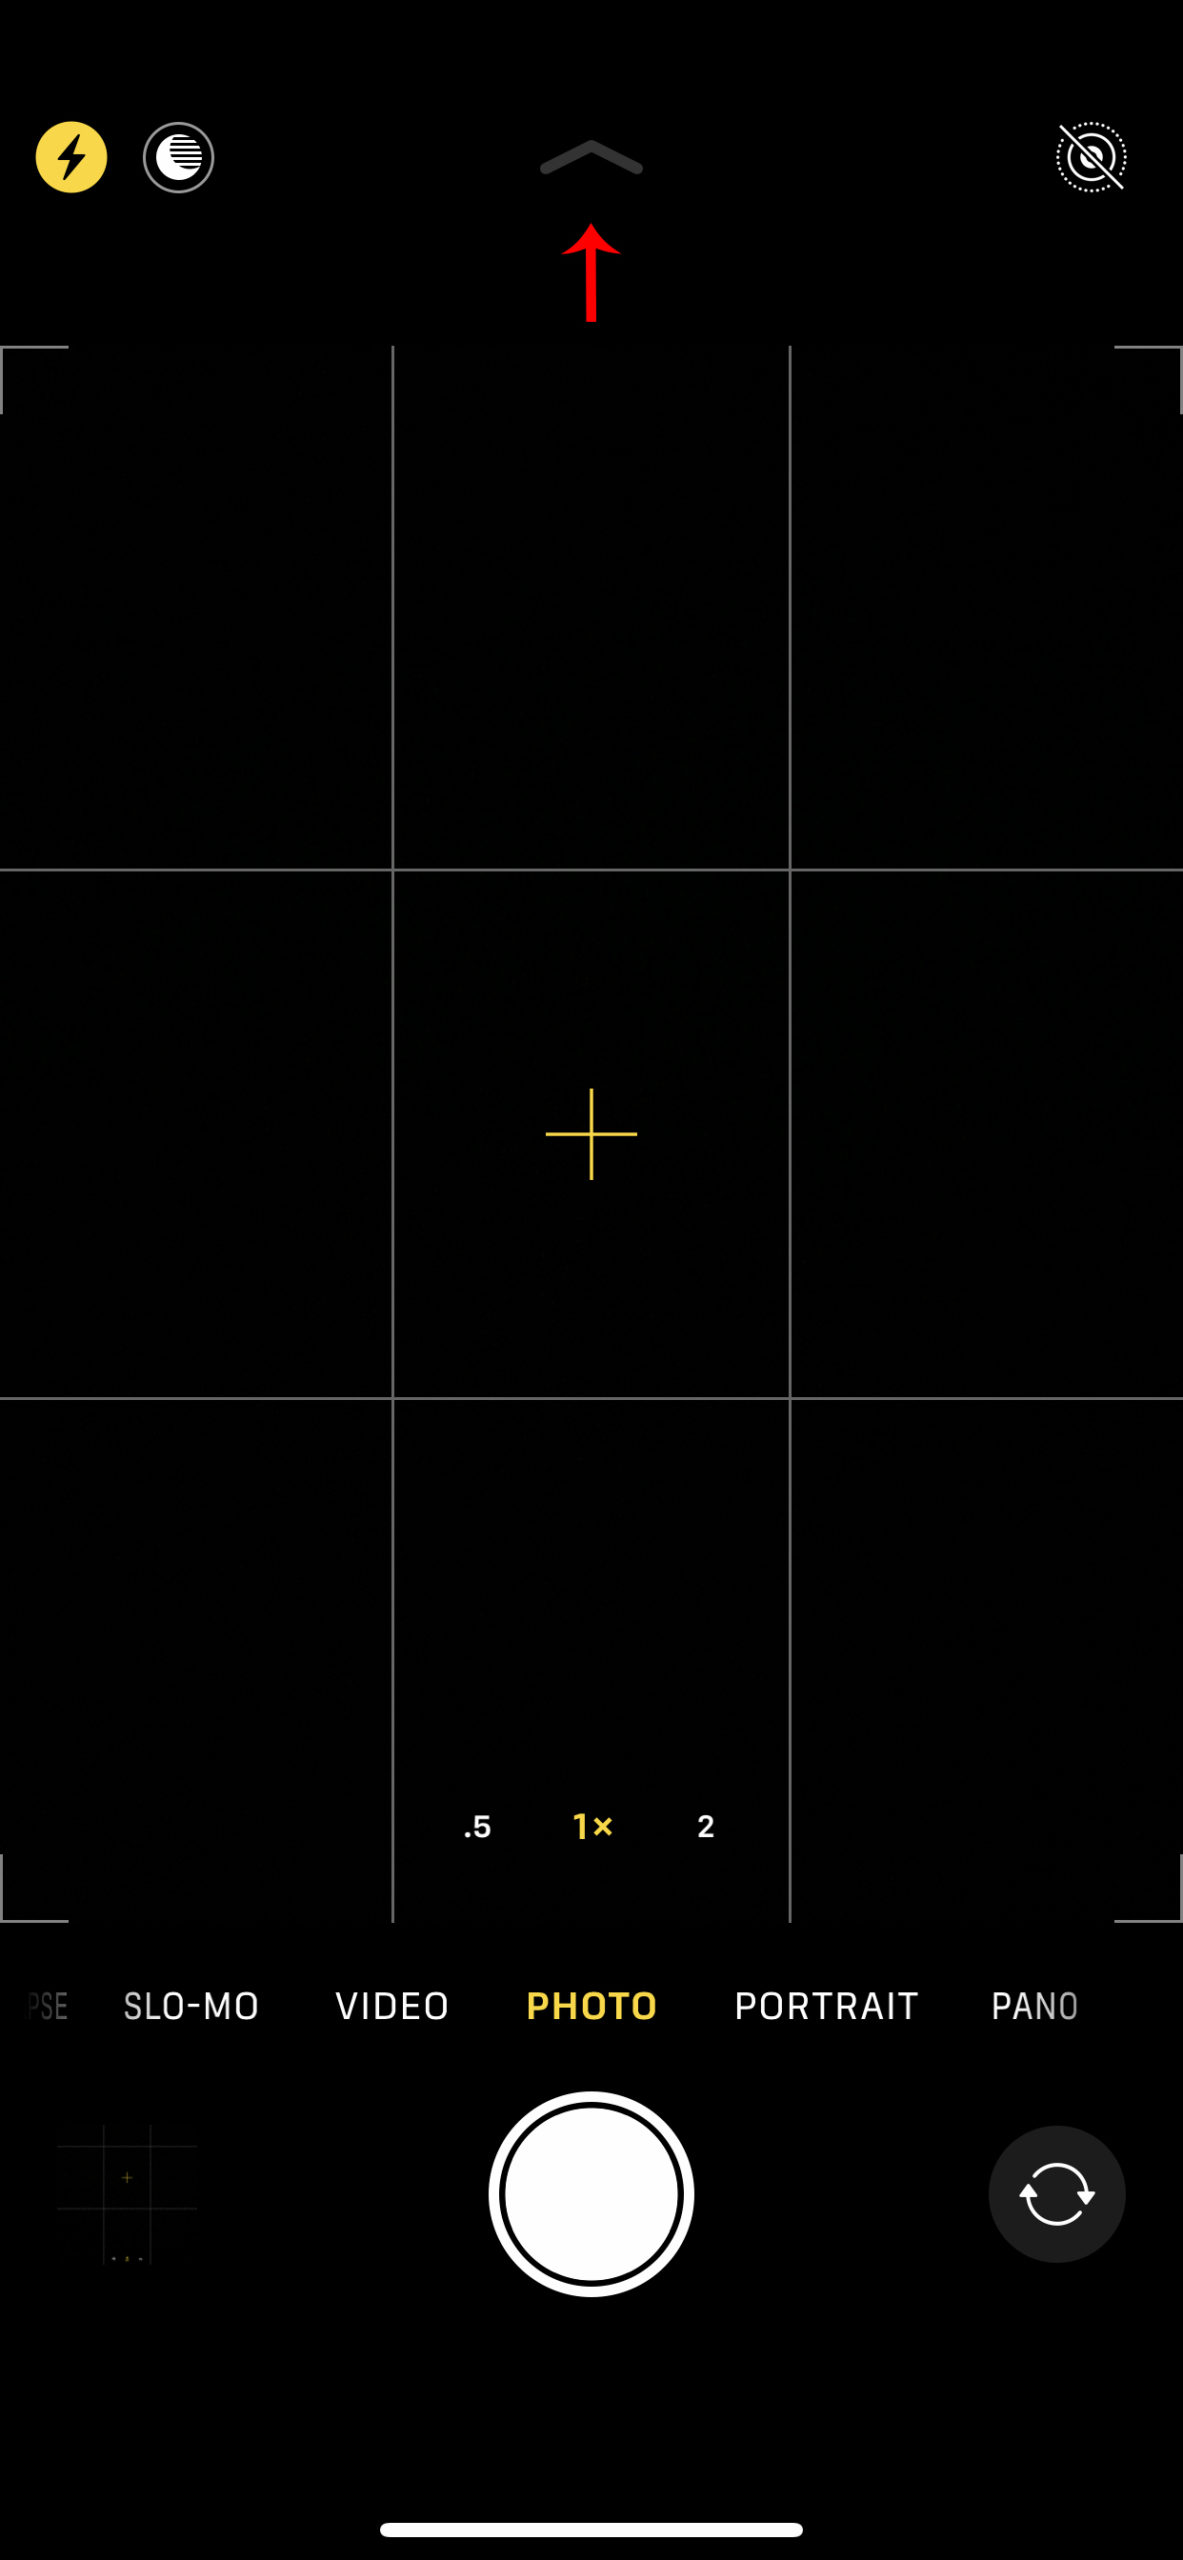
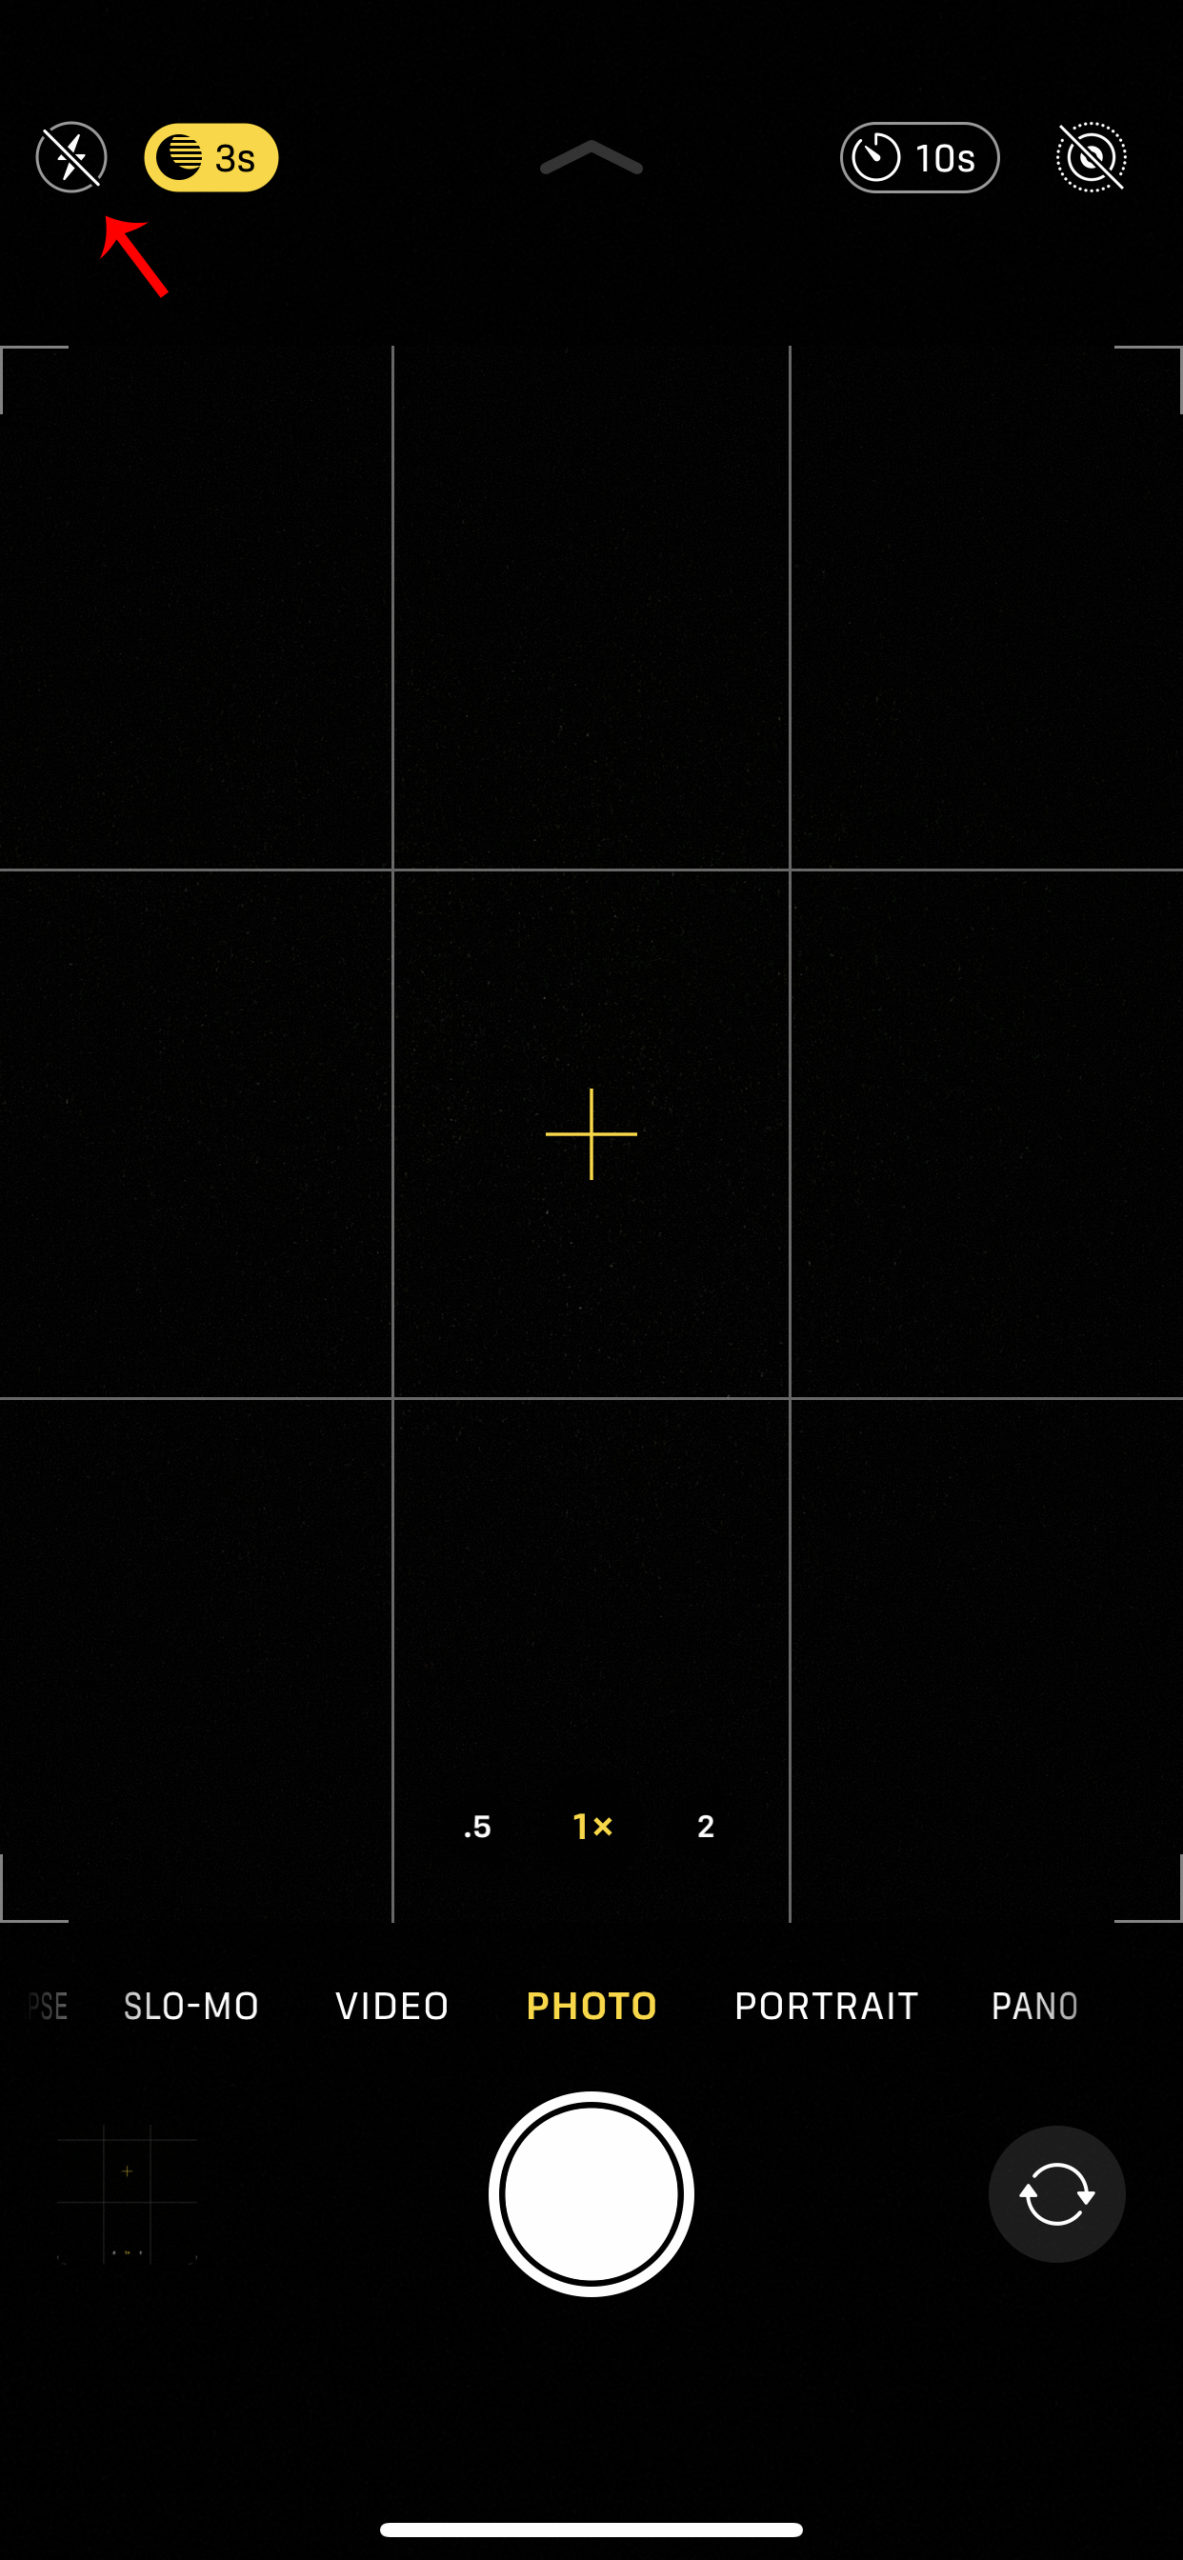
Tap the arrow and you will see additional controls and settings appear just above the shutter button.
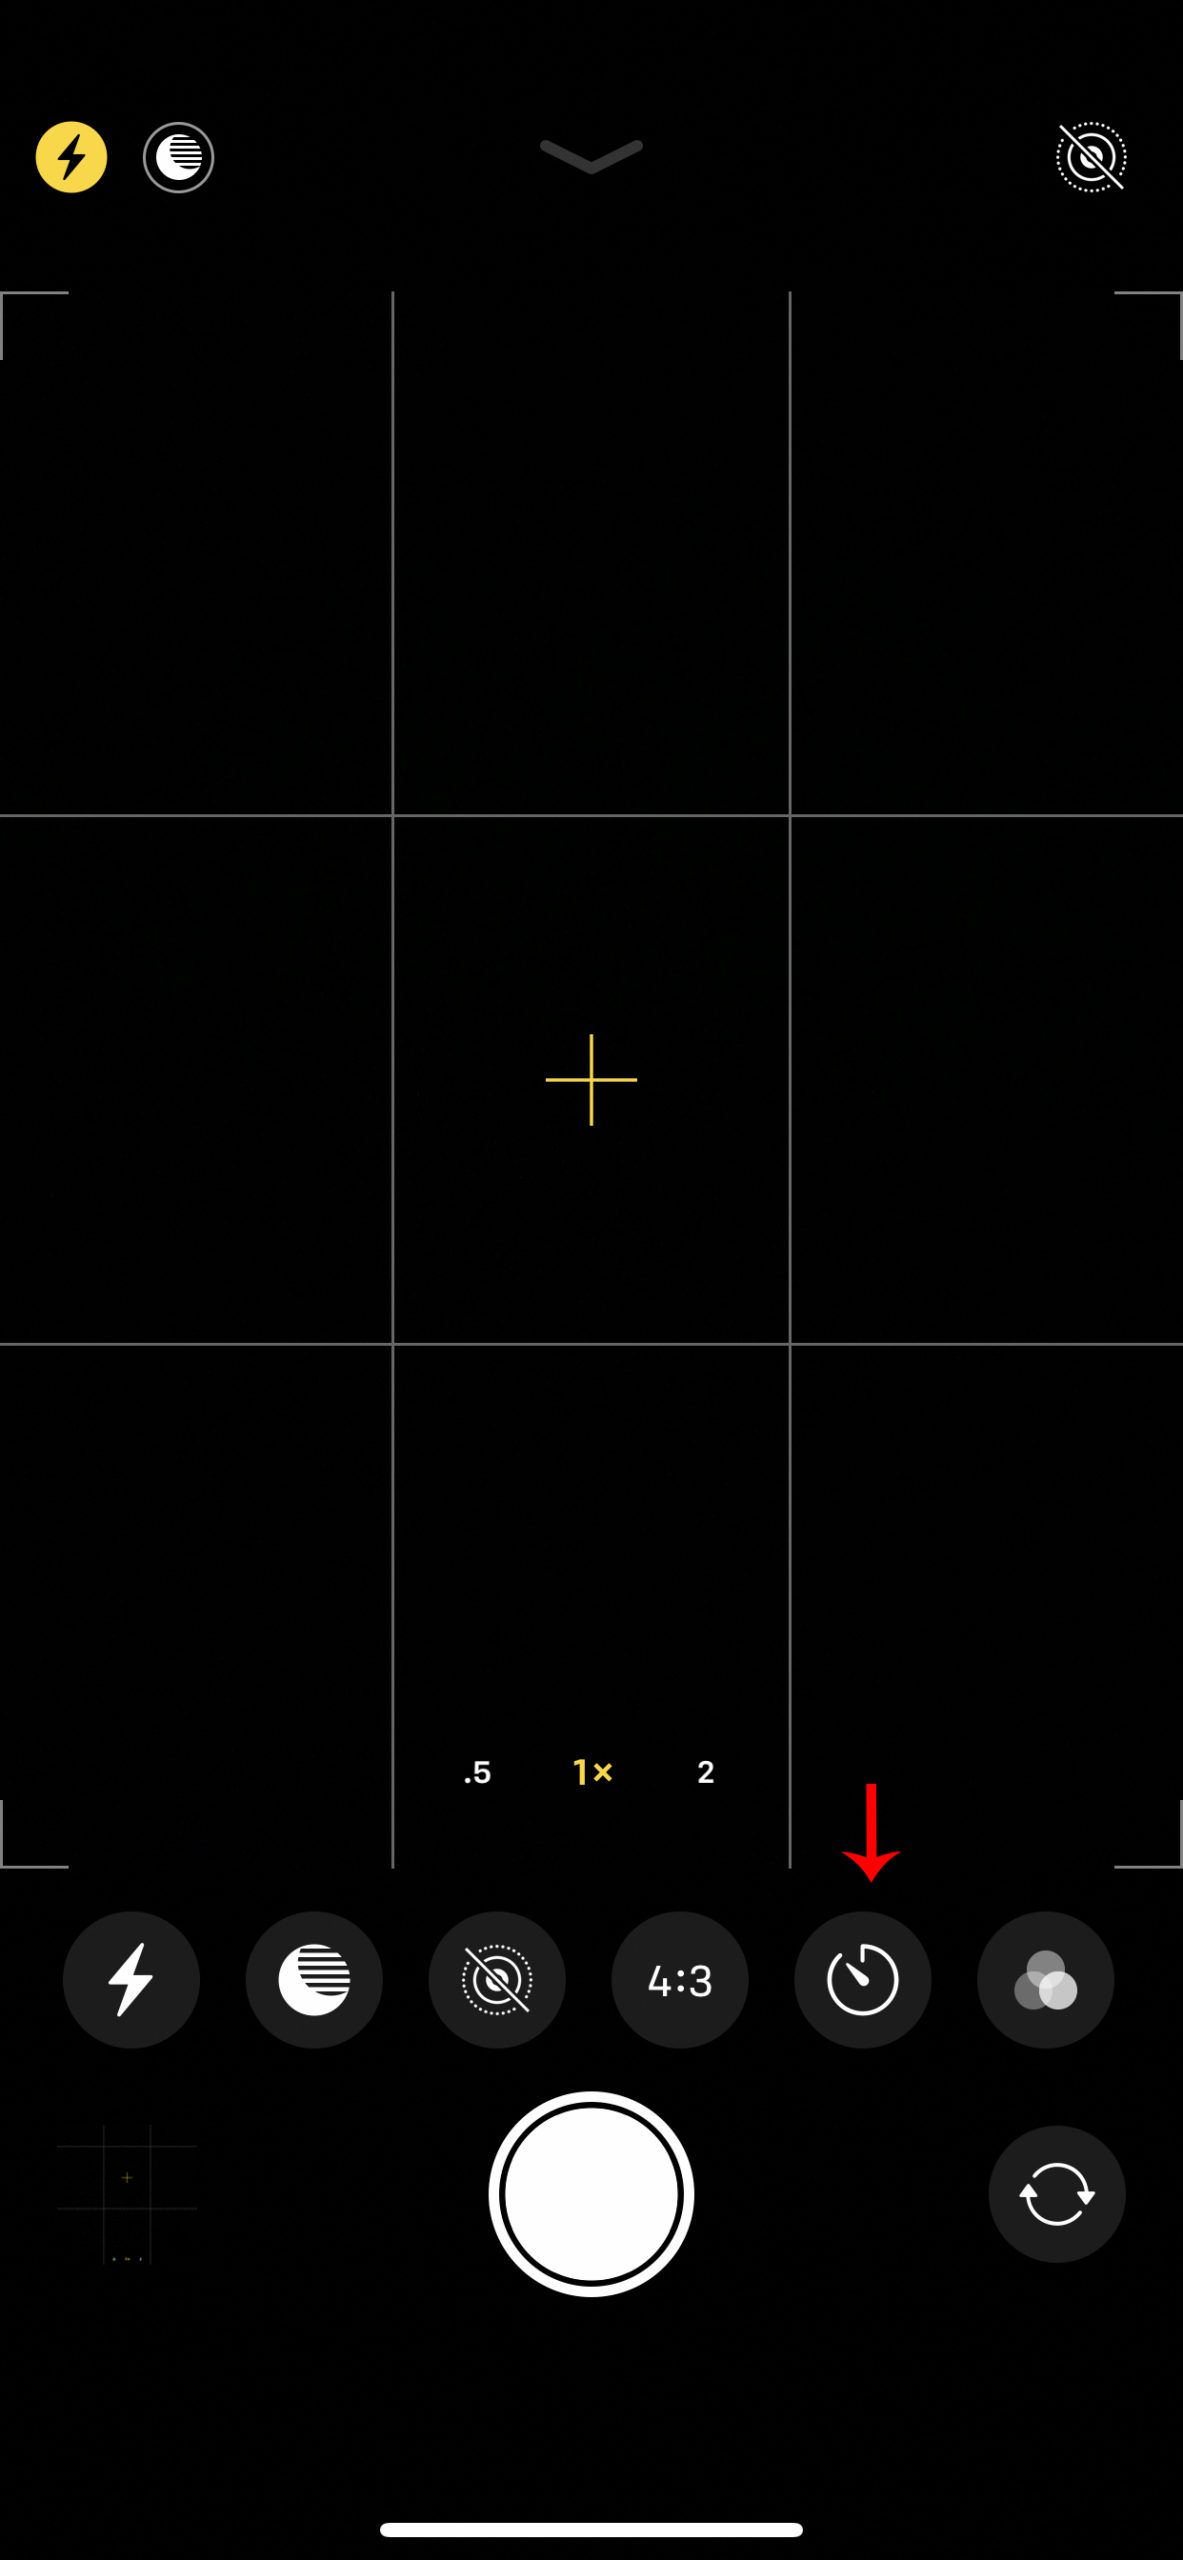
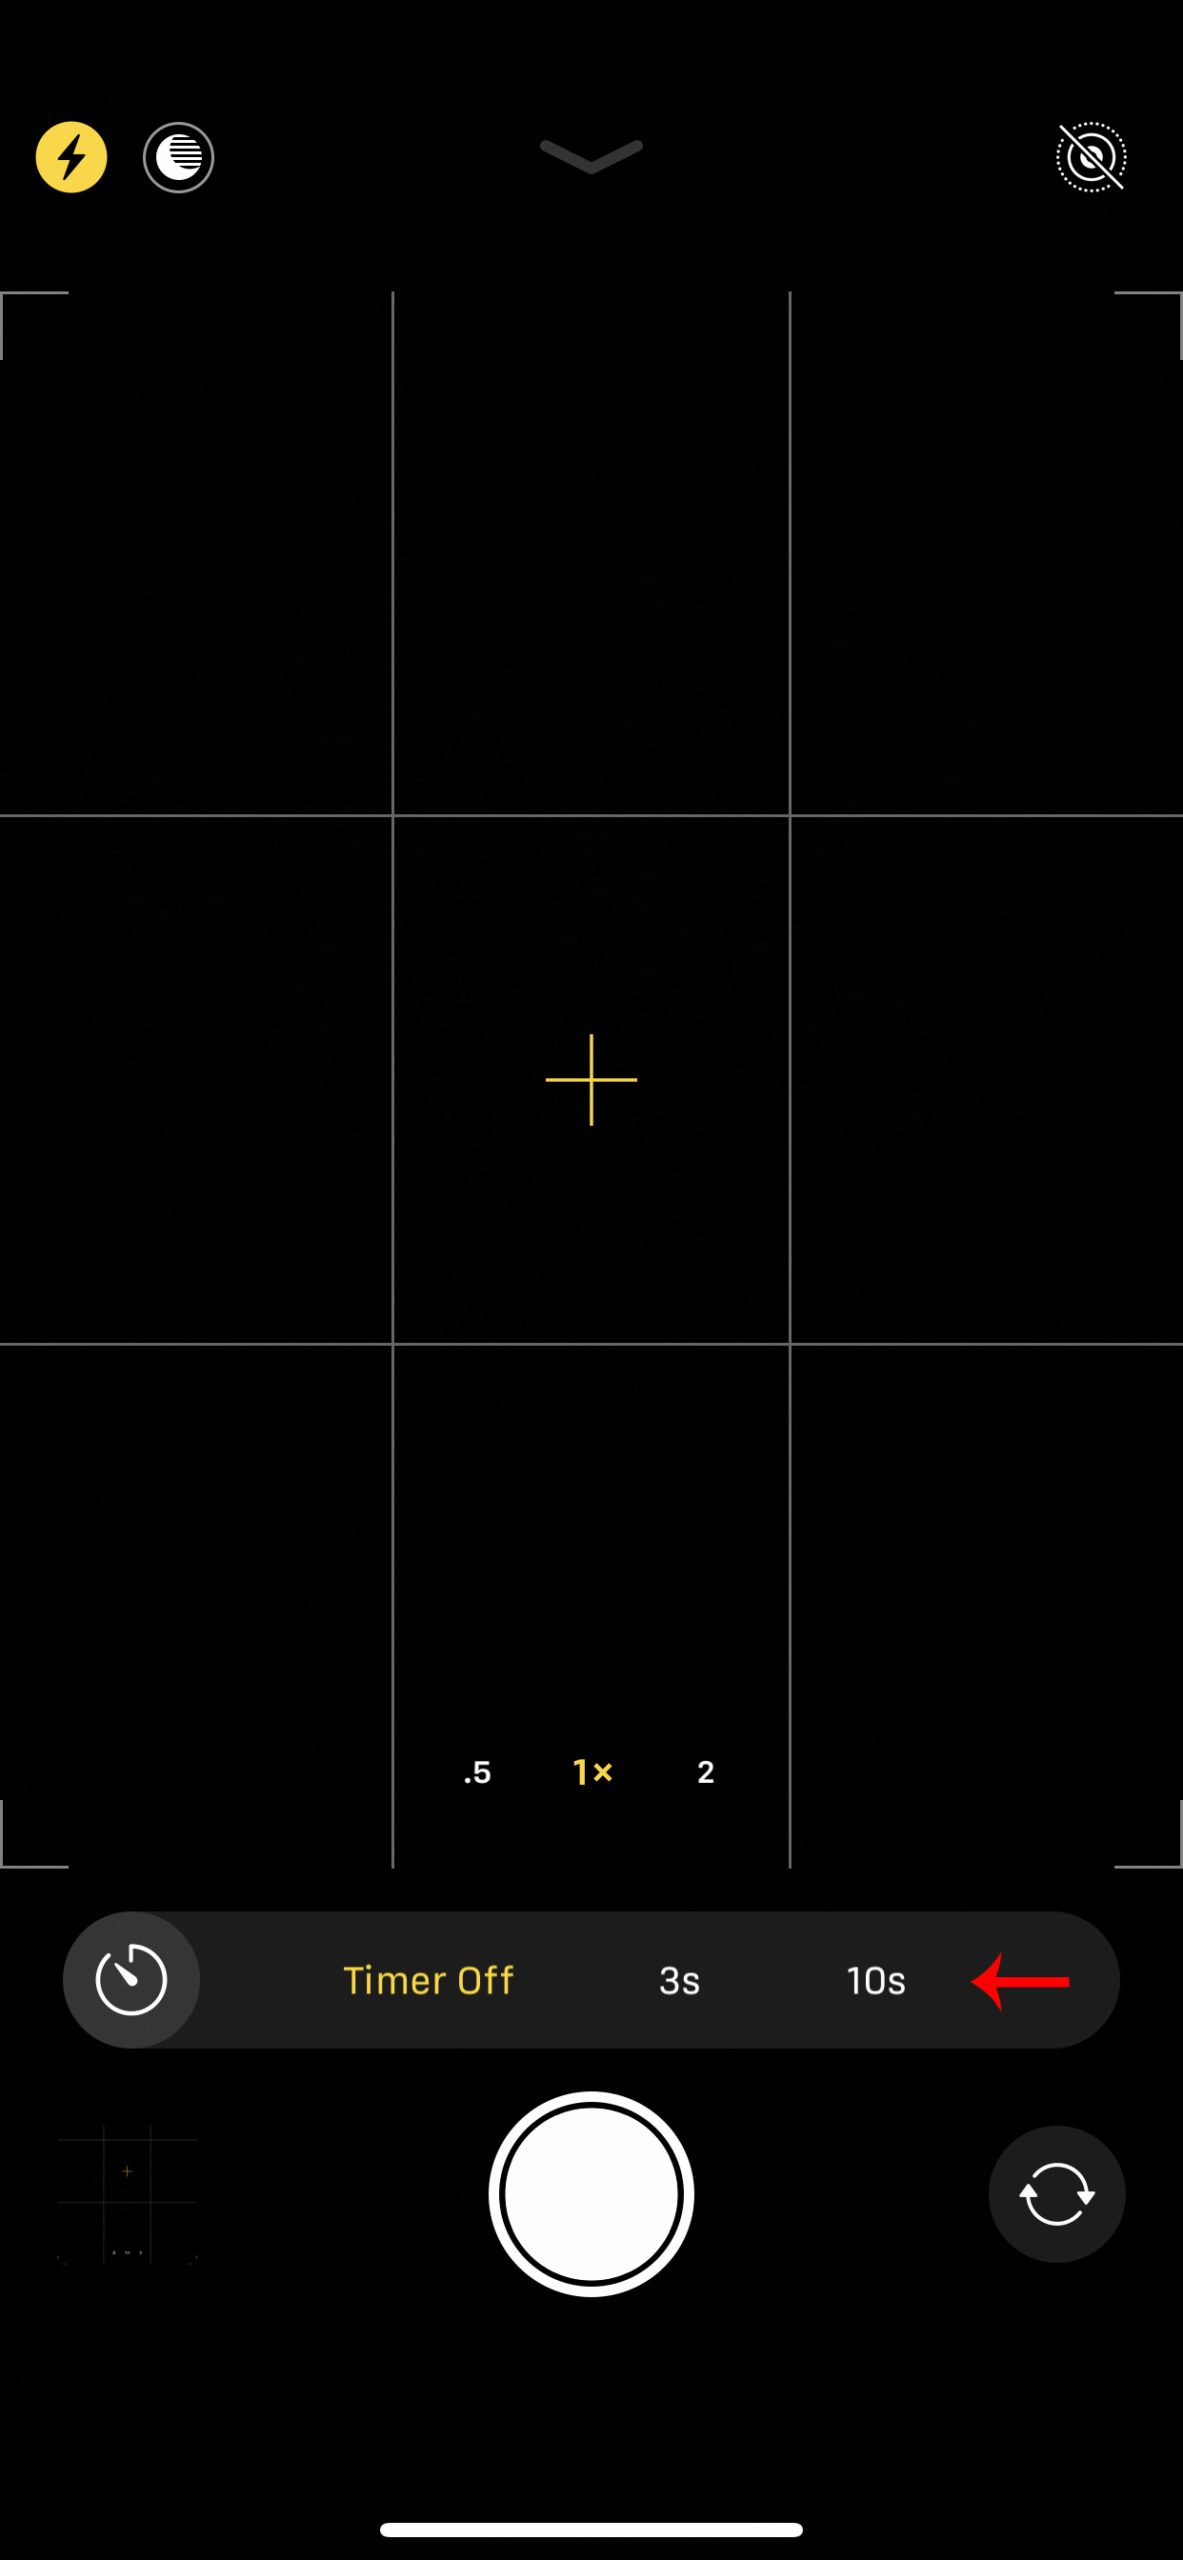
Tap the timer icon and you will see options appear for how long of a countdown – three seconds or ten seconds. As someone who has taken countless self-portraits, I would highly suggest giving yourself ten seconds. Wink!
IF YOU ARE USING A BLUETOOTH REMOTE
You will first want to ensure your Bluetooth remote is turned on. Next, open the ‘Settings’ app on your iPhone and then select ‘BlueTooth’.
With your Bluetooth remote turned on, you should see the name of your remote pop up under ‘Devices’. Once it says connected, simply test the connection by opening your camera app and firing your remote.
Then, you want to remember that the Bluetooth signal between your remote and phone will only stretch so far. You will want to test this as you are setting up.
Once you are set up for your portrait, you simply want to strategically hide the remote so it is not seen in your photograph.
TURN OFF YOUR FLASH
The next setting we want to adjust is your flash. We want this functionality turned off. To do this, simply open up your camera app and tap the flash icon and switch it to off.
CAMERA ZOOM SETTINGS
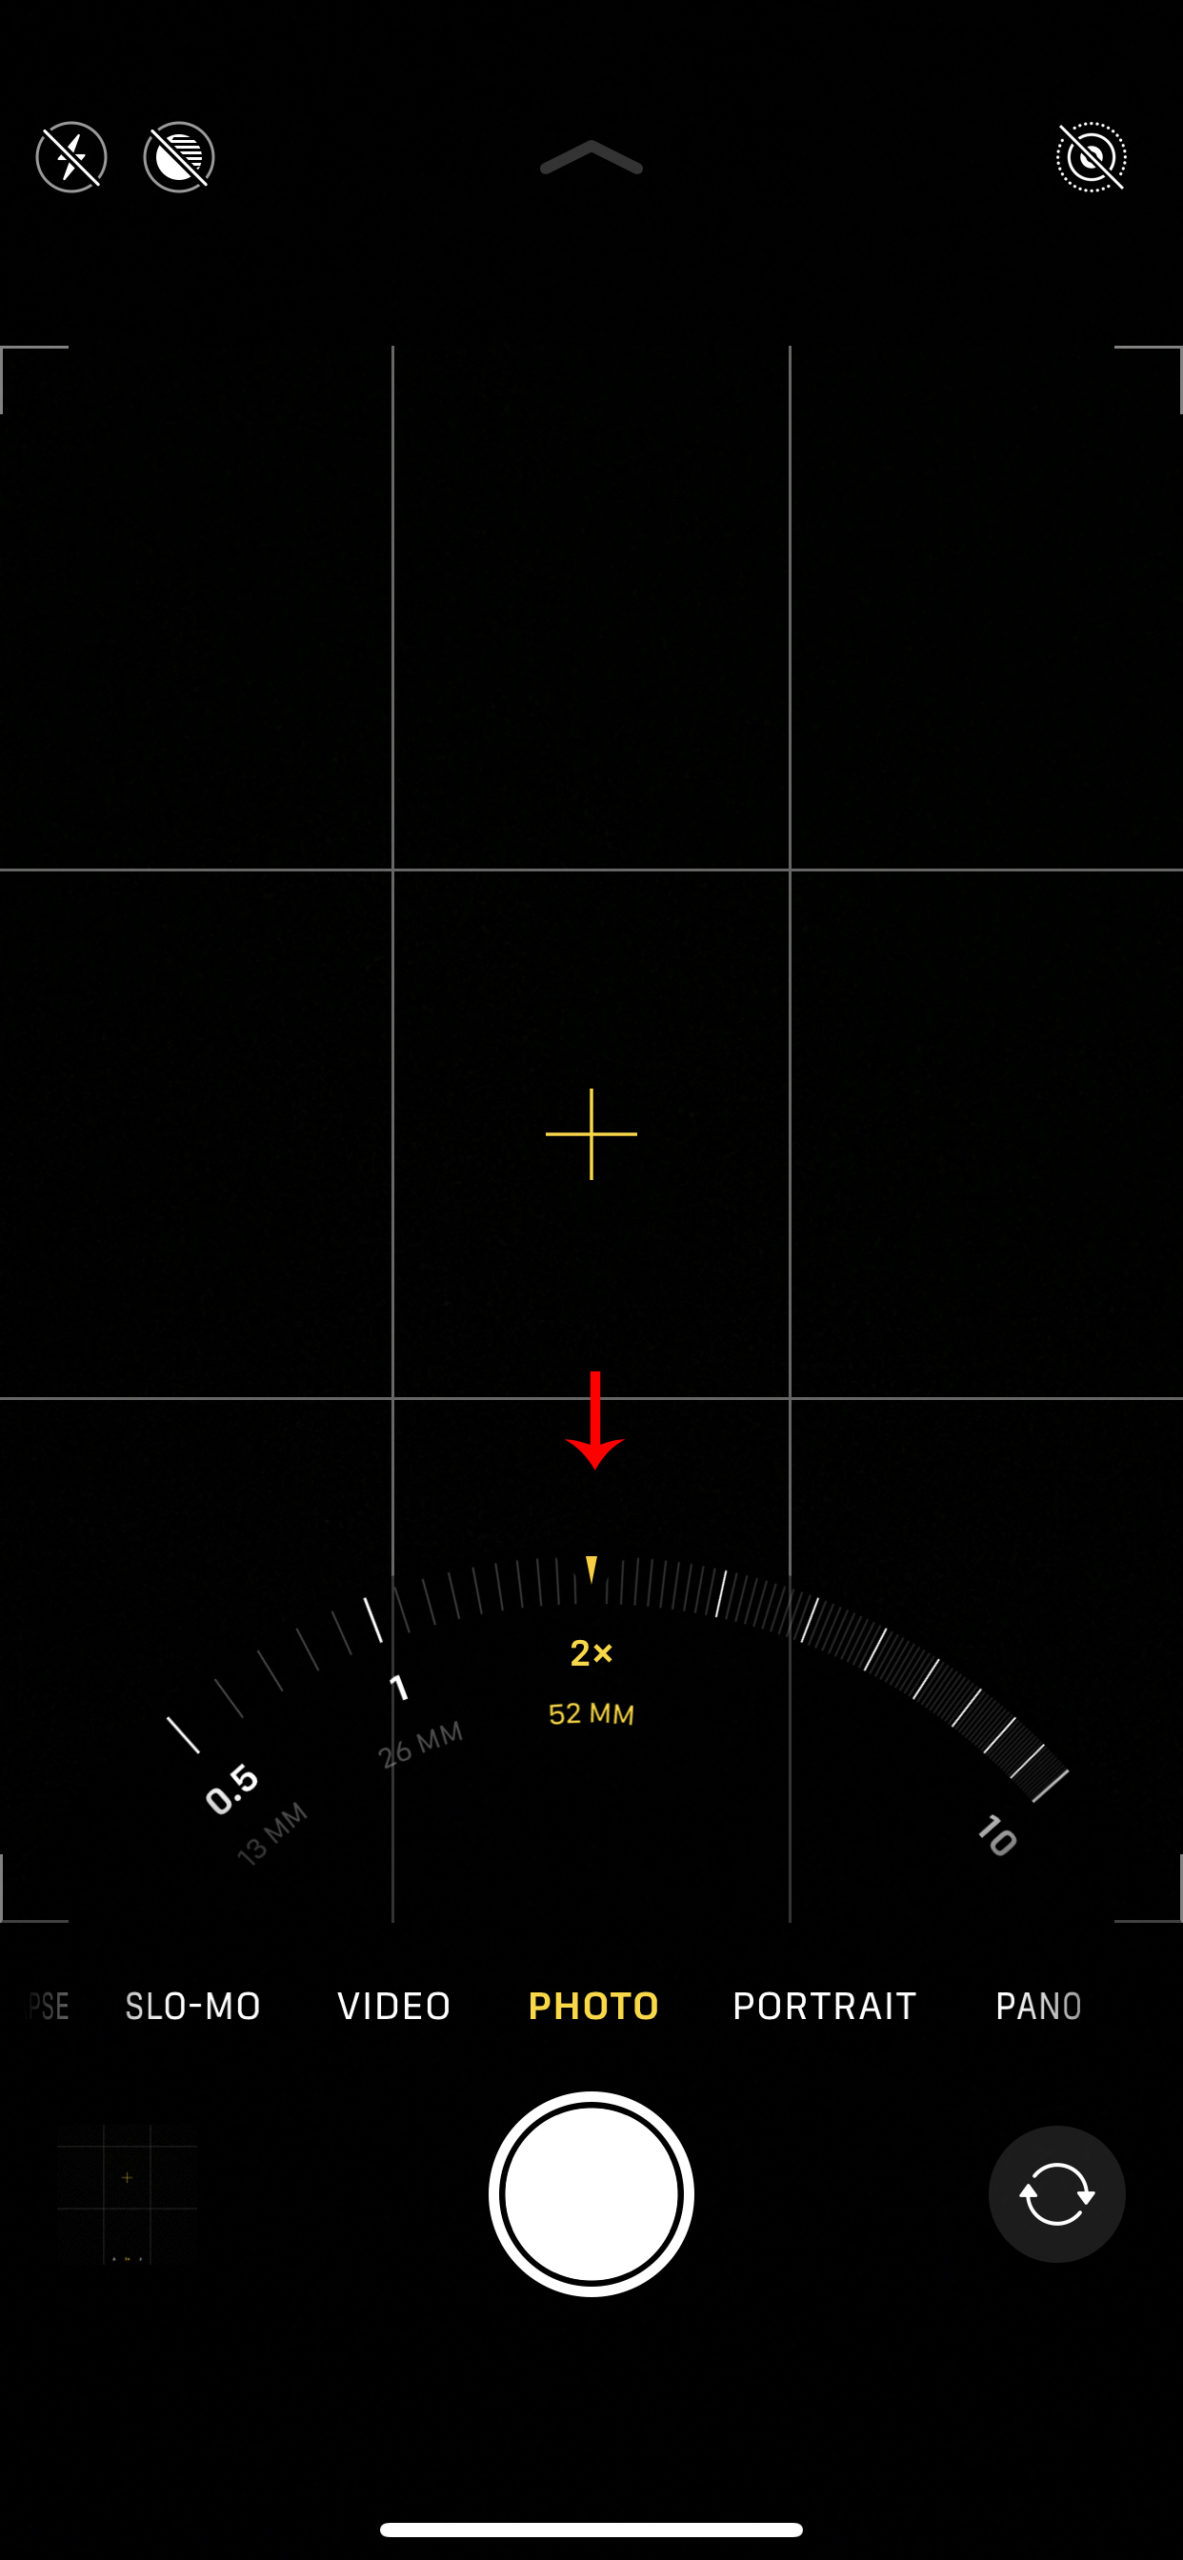
The goal in creating this portrait is to have it, indeed, look like a portrait and not a simple snapshot. To achieve this, we want to take a look at what we can do in regards to our lens and zoom settings where we can.
Please note, if you are using the built-in self-timer option you will not be able to use portrait mode on older iPhone models. And other settings will differ based on the iPhone model you have.
When it comes to the iPhone, the built-in camera is a wide-angle one so we want to be careful with how far or close you set it up because it will distort the edges of your image. We also want to make sure that we don’t zoom in after setting up for your portrait and before firing off your photo. Zooming in will cause the quality of your image to go down significantly.
I have the iPhone 11 Max Pro and for our family portrait, I simply adjusted to the ‘2x’ option.
Wardrobe Choices
Now, this can be a sensitive subject sometimes when it comes to photography. There will be those who prefer to approach it completely naturally and allow everyone to wear what they would like and that is just fine. But let’s just say that is not how we do it at our house. Wink!
For this portrait and the reason behind this project, I knew I wanted it to be classic and timeless in a natural way. I wanted it to feel like us, at home, and in our element, but without distractions of logos, baseball caps, or sports jerseys. Thirty years down the road when I look at this portrait and recall the time we were facing, I want the focus to be on the people, on the memories, and on the feelings of this time. I don’t want to be distracted by fashion choices, unkempt hair, or anything else that will detract from the heart behind the portrait.
My suggestion is that everyone is properly dressed while also trying to avoid logos and messages on shirts. Also, make sure and have hair done, clean faces, and barefoot. We’re hanging out at home after all.
Setting Up Your Portrait
Now, this will also differ based on what you have available. For our setup, I used my main tripod with an iPhone attachment added to it.
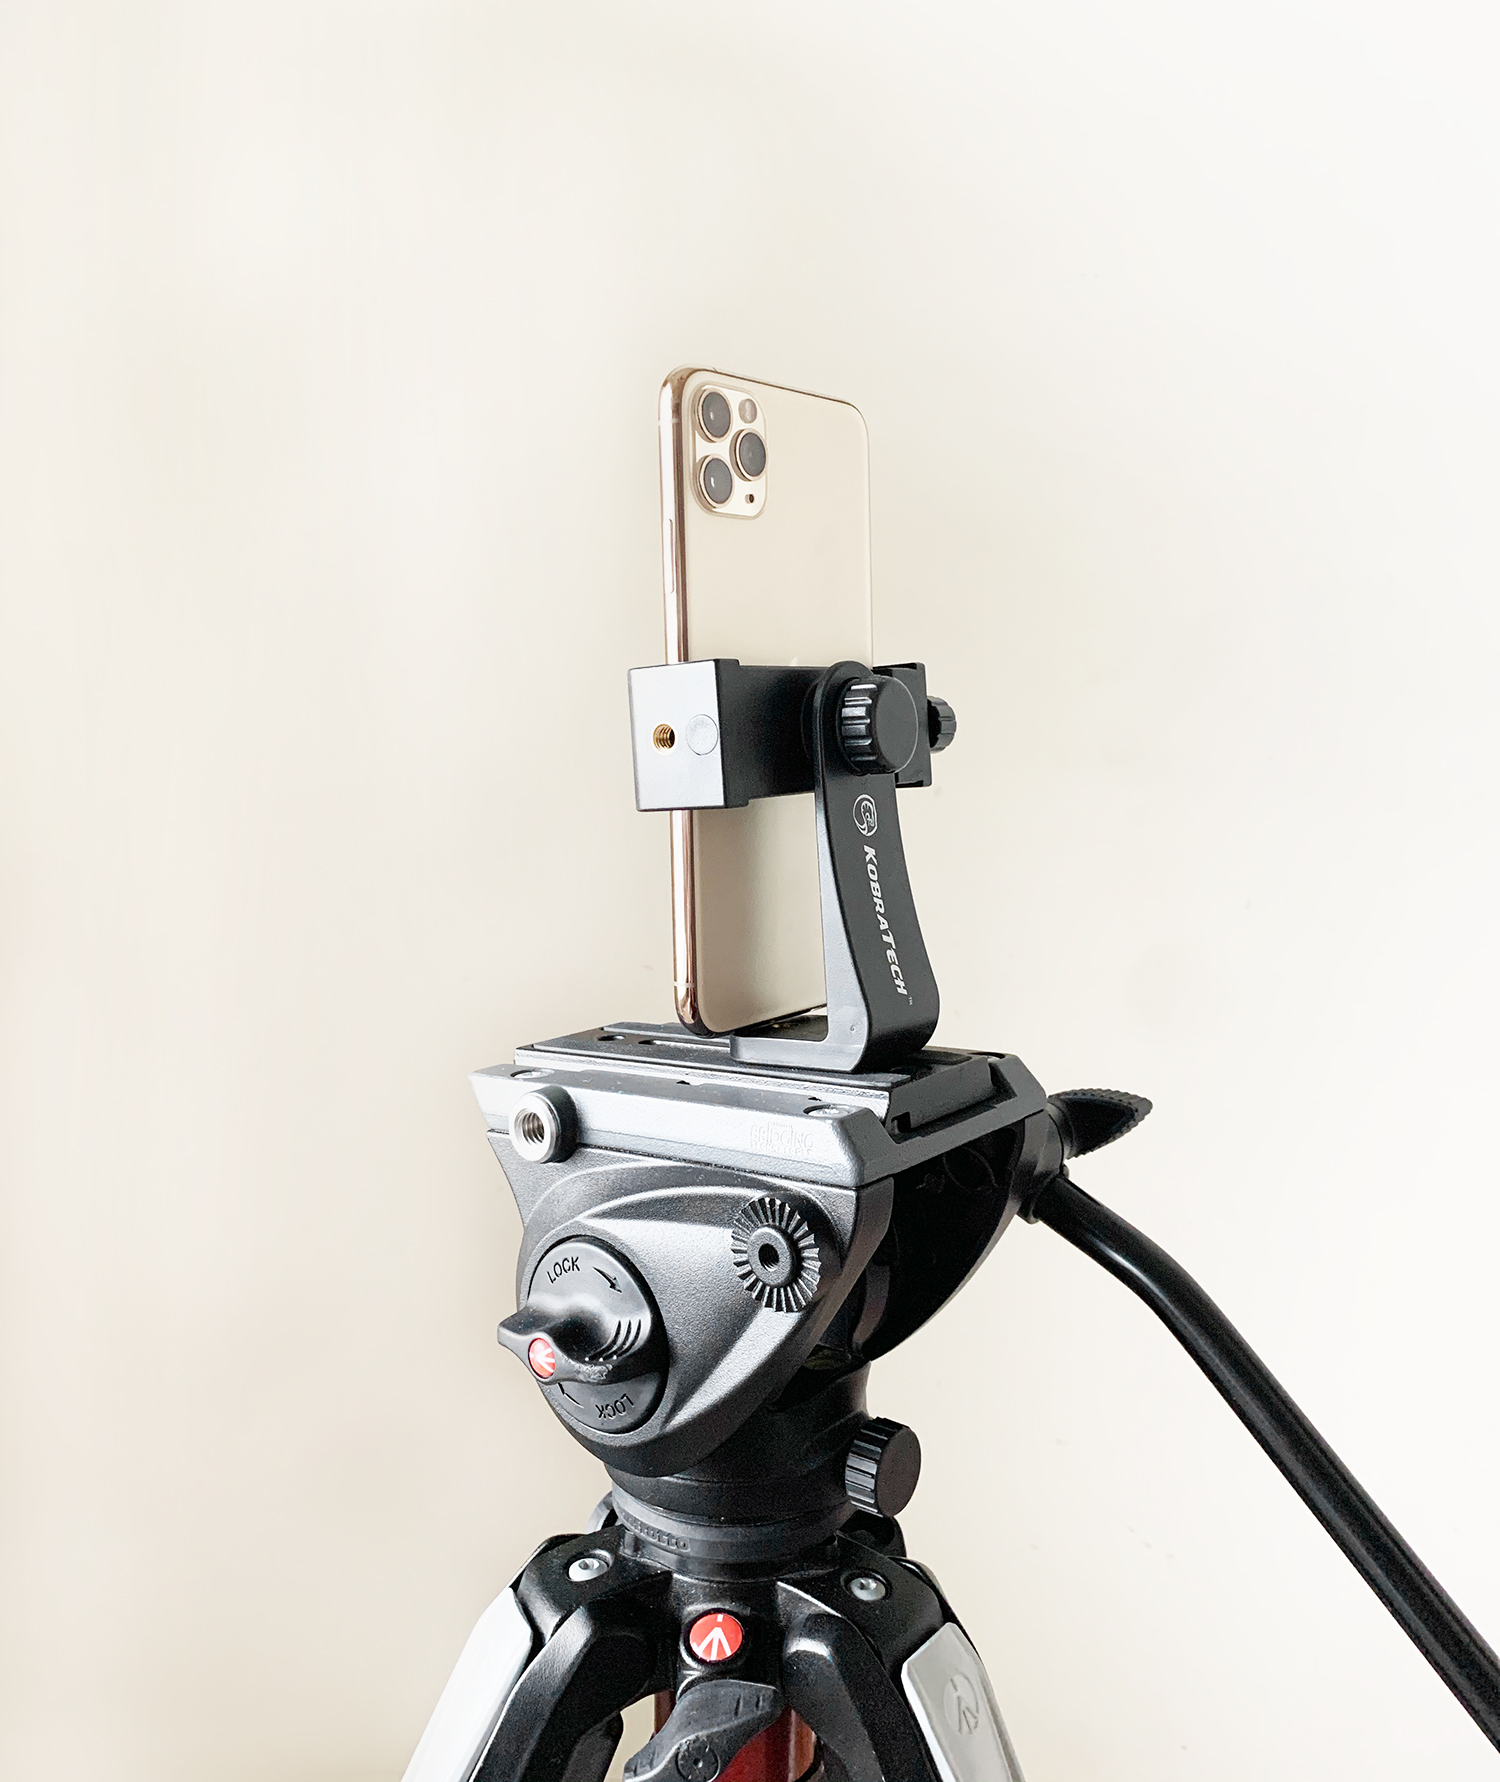
If you don’t happen to have a tripod, I want you to get as creative as possible in setting your iPhone up. You can use a ladder, stack several boxes on top of each other. Anything you can do to get your iPhone stable at the right height for your portrait.
LIGHTING
For this specific portrait and to create the iconic feel of what we are facing historically, we want to set up at the front door. Choose a time of day when there won’t be any direct sunlight rays hitting anyone in the photo, but when natural light is available. With the door open and everyone posed right in front, on, and right behind the threshold, the lighting will allow for great natural contouring. Also, we want to make sure that all interior lights, as well as exterior lights, are shut off. We only want to utilize natural light.
THE ANGLE OF YOUR iPHONE
Once you have figured out the best way to set your iPhone up for the photo, you will want to ensure the angle of your phone is parallel to everyone in the picture. This will create more of a portrait feel to your photograph rather than a distorted feel.
Choosing a “runner”
If you are using the built-in self-timer option you will need to designate a “runner”. We lovingly refer to this person as the one chosen that is old enough to know the camera functionality and who can haul you-know-what back to the group and in the frame before the ten seconds is up and the shutter fires.
My personal preference is this person is never me. Only because re-posing and worrying about hair, etc is way too involved for us women if you know what I’m saying. I suggest choosing someone who can work the shutter button, but who is also posed towards the front so jumping back in the shot is not too difficult.
Posing
My number one tip for this part of getting your portrait is this: As the documenter, you want to first post everyone else, ensure that everyone is in the frame properly and that all faces can be seen, then add yourself to the shot.
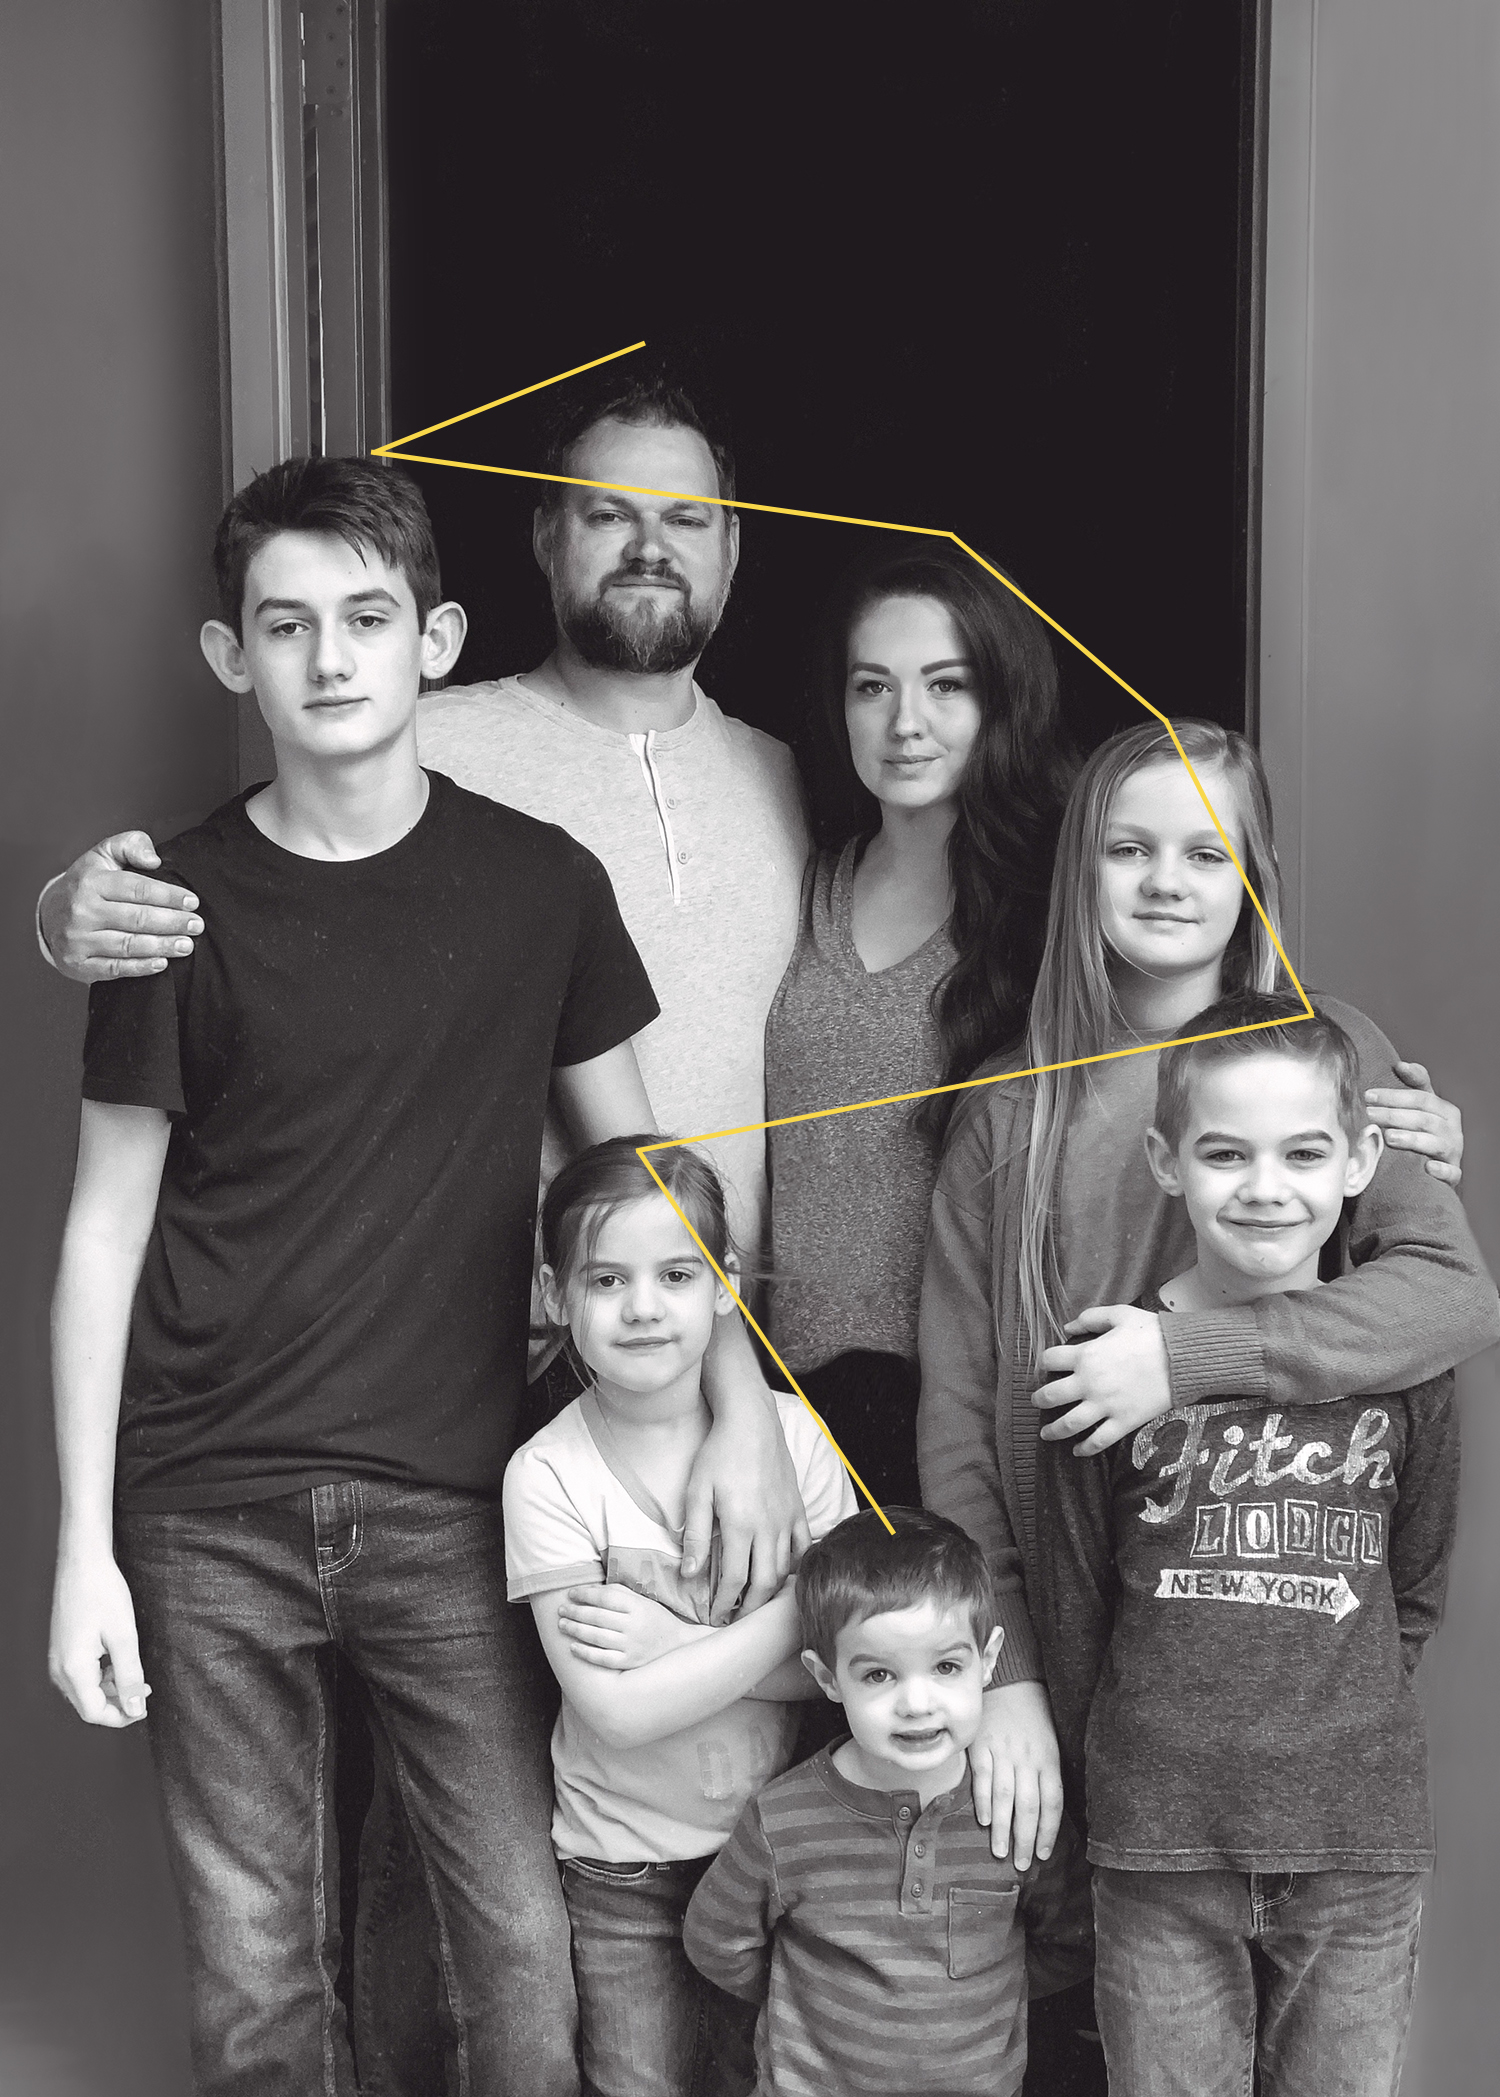
When posing, you want to create levels where you can. For a project such as this portrait, having Mom and Dad in the center makes the most sense with everyone gathered around. It creates a sense of hierarchy and is a traditional approach to the placement of everyone. If you are in a different situation, then you will simply want to start with the tallest person in the center.
From there, you simply want to create levels when posing everyone working your way down. Here is our family portrait with some added diagramming to give you a visual:
Expressions
If you have little ones, you need to go into this project know that it is simply going to take patience on everyone’s part.
When we took our portrait, I made sure to tell the kids why we were taking it and the importance behind it ahead of time. In doing so, I think it helped us all to stay in the right mind frame when things got a little difficult with our resident toddler.
When I had everyone set up, I simply asked them to think about all that we have experienced since being home. The news, the questions, the concern, experiencing church at home, not seeing friends, the stories – I simply asked them to reflect on all of that. And I simply asked them not to say “cheese” or show teeth. I simply wanted peaceful and genuine expressions.
This part will definitely be the hardest part of this project, but it is not impossible. Remember to stay patient and let’s all be grateful for digital technology and the ability to take unlimited photos.
Motivation for everyone to be involved
I have been blessed with a family that understands the importance of photos. I’m sure this has everything to do with my history and heart behind it all, but I don’t really deal with complaining that often and never from my husband. I know not everyone is in the same position. For those of you that may have a difficult spouse or an older known complainer in the house when it comes to taking the time for pictures, I would invite you to share this post with them. I am a firm believer in tough love. Wink!
There you have it! I hope you found this post on how to create a family self-portrait using your iPhone helpful. My hope is that you are feeling more confident to make your own family portrait happen and to document this time of staying home.
Part Three is coming tomorrow and it is all about editing your portrait for a classic and timeless finish. Feel free to drop any questions below and I would be happy to answer them! You can also catch more over on my Instagram or my Facebook page. And absolutely share with me when you tackle your family portrait – I would love to see it! Simply use #ProjectMyLegacy on Instagram.
Shop my gear
If you are looking for the same equipment I use, you can find all of my gear over on my Amazon affiliate page here.

Enjoy the entire series
If you missed part one of this project, you can catch it here. Stay tuned for part three in this series.
And here’s to documenting our personal history. Here’s to our legacies.


Binge the Latest:
Download The FREE Holiday Planner
Experience all of the joy
this holiday season and none of the overwhelm.


April 29, 2020